Sorry, the content of this store can't be seen by a younger audience. Come back when you're older.
Dance Floor Kits
SESXLSBK-12-KIT33
New Product
Regular price$138.00
/
Estimated to Ship by: May 18 - Jun 5
Backed by a 12-year warranty
Manufactured in ISO certified facility
Portable Practice Dance Tiles
Lightweight and portable with PowerLock™ technology
Classic Kit includes 9pcs 12"x12" tiles plus edging
Heavy & Large Item handling surcharge applied at checkout for this item.
Description
Our dance floor kits offers a complete setup with its smooth and durable surface ideal for any special event.
Lightweight and highly portable, they ensure a quick setup and take-down time, making them perfect for weddings, parties, and other occasions where guests can dance the night away.
Features and benefits:
Lightweight and Easy to Carry
Weather Proof
Easy to Install
Customizable
Easy to clean and maintain
PowerLock interlocking technology
12-Year manufacturer’s warranty
What's in the kit?
Classic Dance Floor Tiles Inclusions (12" x 12" tiles)
3'x 3' kit
6' x 6' kit
Classic [9 pcs - 12”x12” tiles] , XL [4 pcs - 18”x18” tiles] , Plus [1 pc - 36”x36” tile]
To be able to best assist you and make a recommendation on the right dance floorsize and style for your application, we kindly ask that you answer the following questions: •What is the primary purpose of the dance floor? Is it intended for social events, weddings, parties, or other specific occasions? •How many people do you hope to beable to accommodate at once? •Do you have a size in mind? If so, what are the dimensions (lengthx width)? •Will it be a permanent fixture or a portable/adjustable one? •Will the dance floor be used indoors or outdoors? Or both? •What kind of surface will thisbe going over? •If it will be going over carpet, what type of carpet(thin/firm, thick/plush)? •Can you share photos of the area where it would be installed? •Will you be requiring a storage cart for storage/transport? If so, please keep in mind that the storage cart is 38”x38” should you need to measure your doorways. • What is the estimated number of guests that will be on the dance floor at any given time? A general guideline is to allocate 3 square feet per person on the dance floor.
Regardless of your venue's terrain - be it grass, sand, or any solid ground, our dance flooring has been meticulously crafted to transform any space into a vibrant dance floor in an instant. It showcases the perfect fusion of form and functionality, combining an easy, tool-free assembly process with a durable, all-weather design that stands up to the most rigorous dance routines.
Portable & Easy to Install
Each 3′ x 3′ panel weighs just 18 lbs, making it easy to transport and install while providing a sturdy surface for dancing. Enjoy the perfect balance of lightweight portability and durable performance.
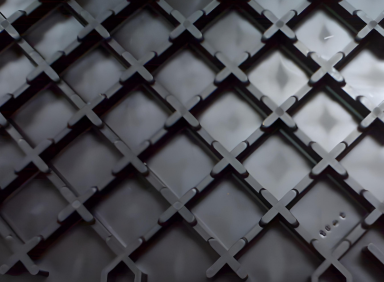
No Walk Technology
Our portable dance floor tiles comes with No walk peg bottom. With 840 support structures per square foot, your floor remains stable throughout the entire event.
PowerLock Interlocking Technology
Its locking system is the industry's most advanced and durable, designed for long-term performance. With four locks per edge, it ensures easy installation, removal, and durability across various terrains.
How it works
Our Large Dance Floor Tiles are ideal for outdoors base like grass or sand with it's no walk peg bottom. This can also be used indoors with thick, padded carpets. While our XL and Plus Dance Floor Tiles come with grid bottoms. Ideal in thin carpet and over concrete/hardwood floor base.
Once you have your base ready, choose the kit that suits your needs.
The pre-assemble kits comes with dance floor tiles and edging. See Kit inclusions in the description for more details.
certified easy to install
Floor Setup Simplified in Just 4 Steps
Step One
Begin the installation by laying down your first panel in any one corner and pointing the female PowerLocks in the two directions that additional panels are to be added.
Step two
Place the next panel so that the male PowerLock line up over the top of the female loops on the first panel. It’s important to make sure that the female PowerLocks are facing exactly the same direction as the first panel.
Step Three
Gently step along the joint of the two panels. You will hear and feel the PowerLocks snap into place as you go.
Step Four
Once the two panels are joined, repeat steps one through three remembering to keep the female PowerLocks aligned until your floor is complete.
That’s all there is to this easy-to-install flooring!